
Grading in the TU Graz TeachCenter (Exam)
Assignments, exams and self-assessments can be carried out directly via the TeachCenter (Exam) and graded directly in the TC (Exam).
Grades in the TeachCenter (Exam) are GDPR compliant because, unlike teachers, students only ever see their own grades.
Grades can then be transferred from the TeachCenter (Exam) to TUGRAZonline.
General information on Grades
By clicking on Grades in the main menu at the top, teachers can access an overview page that displays the grades of all students in the course in a table: the Grader report.

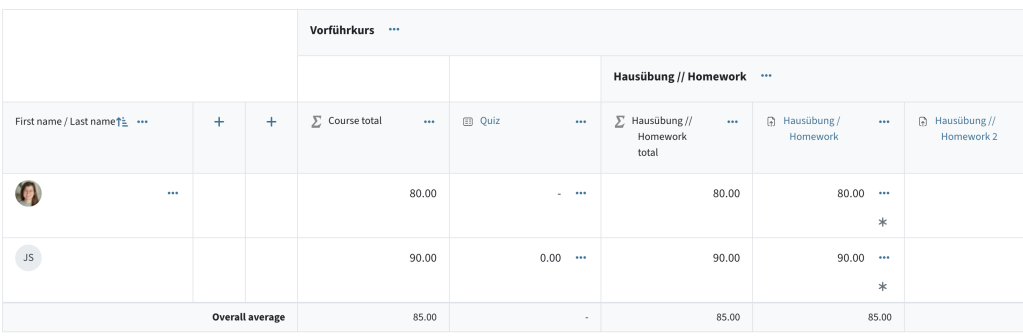
Important: Normally, you do not enter points or grades directly in the Grader report, since these result from graded activities in the course such as "Quiz" and " Assignment".
The Grader report consists of grade items and grade categories. A grade item is a single graded activity, such as a "Quiz" or an "Assignment". A category is a group of grade items, e.g. the sum of all homework exercises. Categories are represented by headings in the table.
Individual grade items and categories can be collapsed and expanded via the three dots menu.
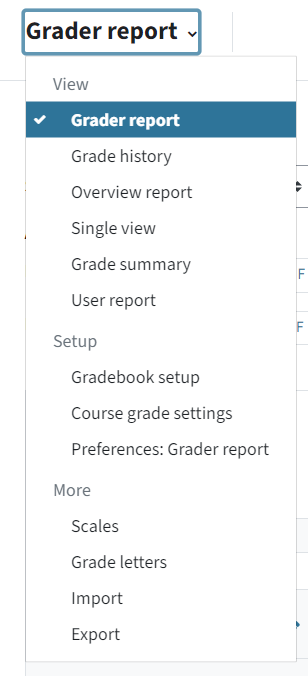
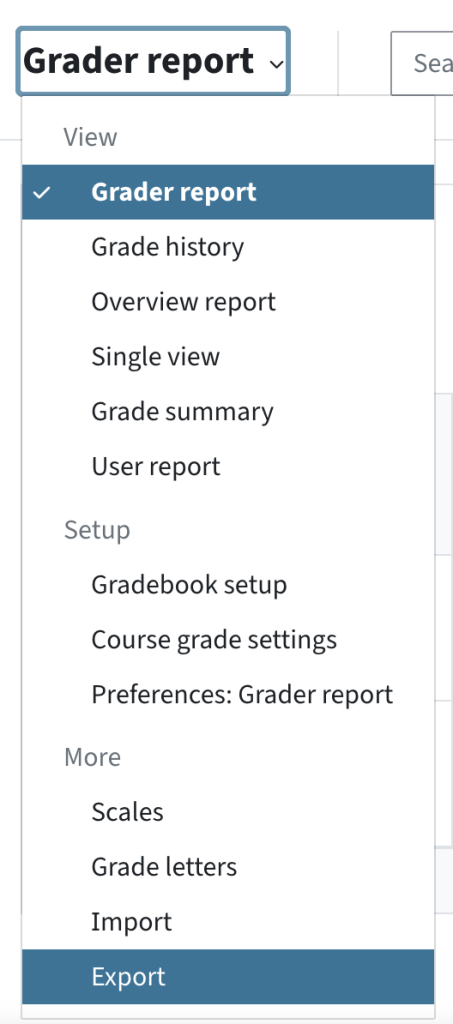
By clicking on Grader report, a dropdown menu with further options opens:
- In View, you can find various options for displaying grades
- In Setup, you can find settings for grading and the grading scheme of your course (see also How can I set up a grading scheme below)
- In More, you can find settings for grade letters and the import and export
Settings in the Grader report
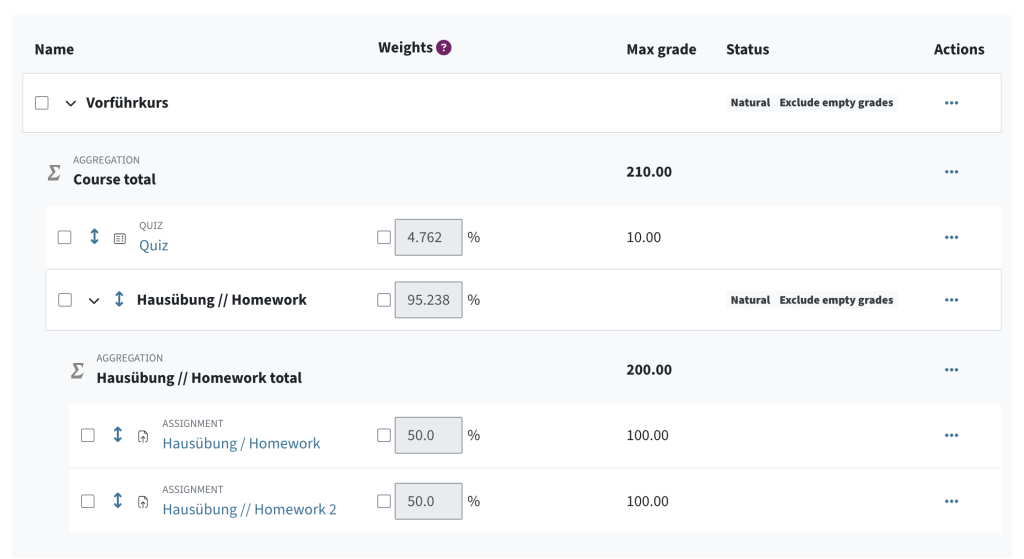
In the drop-down menu under Gradebook setup, you can define a grading scheme for your course. A grading scheme consists of grade items (individual graded activities) and categories (groups of activities, e.g. "homework").
Grade items are generated automatically as soon as you create a graded activity such as an assignment or quiz. The maximum points for an item is defined directly in the respective activity (Quiz, Assignment).
You can, however, add an additional grade item manually, if there is no TeachCenter activity for it, but you would still like to save the points in the TeachCenter (e.g. a presentation). Name the item and optionally, select which category it should belong to. Enter the maximum achievable points.

Grade items can be summarised in categories (folders). Each course has one grade category by default, which has the same name as the course itself. You can create additional categories (e.g. "written homework" and "presentations").
For easier management, you can collapse and expand the categories in the gradebook setup.
To move grade items to a category, click on the up and down arrow next to the item in the Gradebook setup and then click where you want to move the item to. Drag-and-drop does not work in this overview!
Note: We recommend setting up the grading scheme of your course at the beginning of the semester. Otherwise, grades might have to be recalculated. If possible, we recommend working with a maximum of 100 points, as this is the easiest way to manage the grades, avoiding any confusion between grades and percentages.
The weights (percentages) for grade items and categories are automatically calculated based on their maximum points. If necessary, you can override them, but we recommend changing the maximum points of the activities (e.g. creating a text with 40 points and an assignment with 60 points). To override the weights anyway, you need to activate the checkbox next to the input field.
By default, the Grader report shows students' points. However, you can also display the students' grades only or in addition to their points.
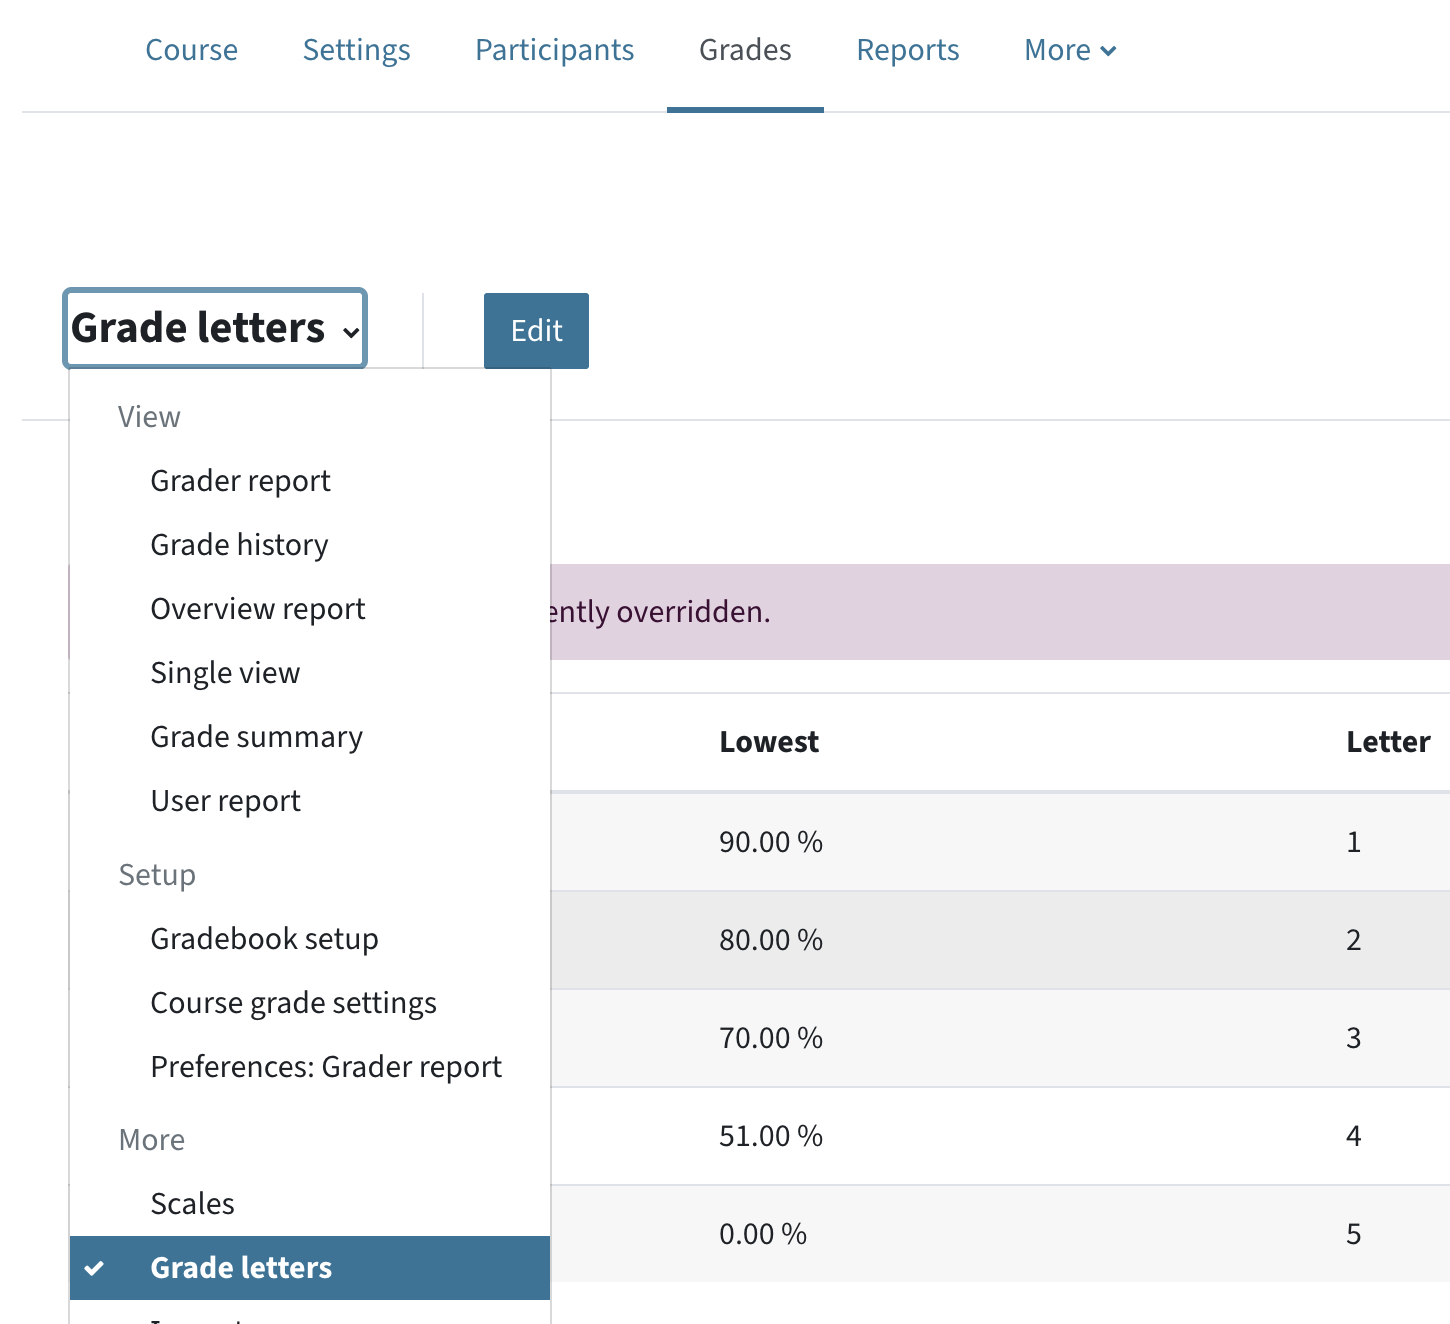
First, check or edit the grade letters: Select Grade letters in the drop-down menu. To overwrite the Grade letters (or numbers), click on the Edit button next to the heading. These settings apply to the entire TeachCenter (Exam) course.
Note: A grading key with grades 1-5 is set by default.
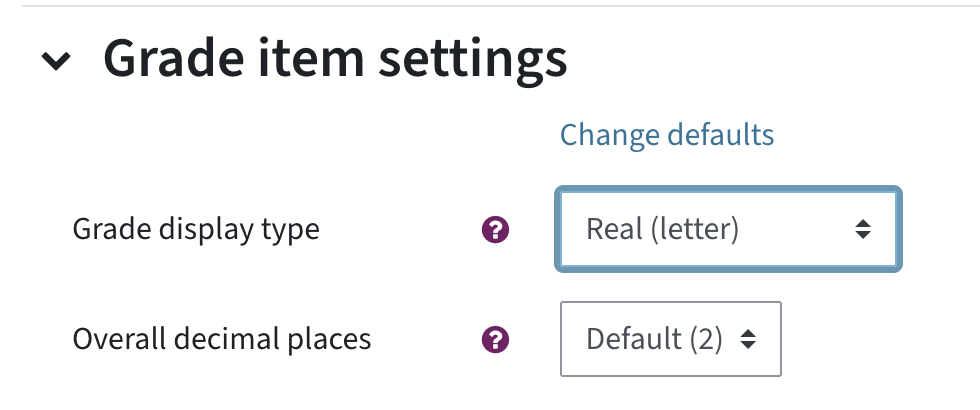
To display grades in addition to points for all activities, select Course grade settings from the drop-down menu. In the section Grade items settings, select Letter, Letter (real) or Real (letter) as the grade display type.
Note: Letter = grade (1-5) and Real = points.
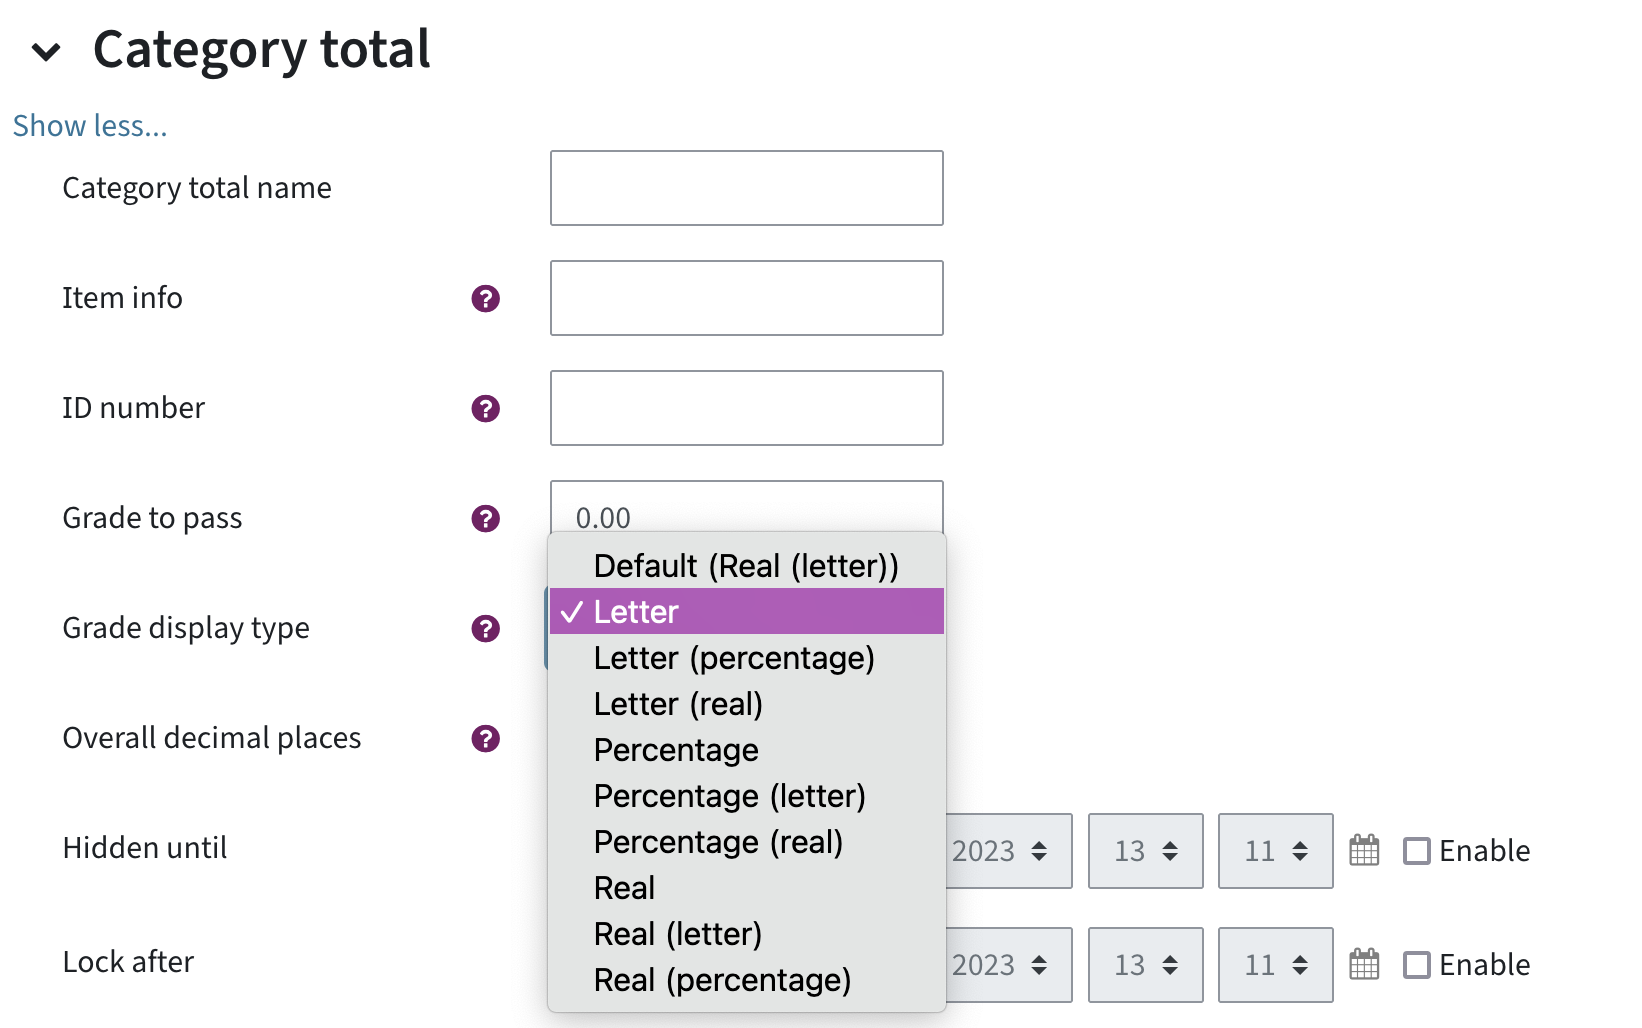
To display the grade letter for the overall grade of the course, select Gradebook setup in the drop-down menu. Click on the three dots for the category with the course name > Edit category.

In the following window, click Show more. On the following page, select the preferred type (e.g. Letter) in Grade display type.
For more complex grading processes with mathematical operators or logical connections, you can enter an equation.
Example: If a student has fewer than 10 points for the introductory exam, they should receive 0 points total and have to repeat the course.
Equations can be entered for each category, e.g. for the course total grade or for categories you have previously created.
Go to the Grader report and switch on Edit mode. Next to the category you want to edit the equation for, click on the three dots > Edit calculation.

A page for entering the calculation appears:
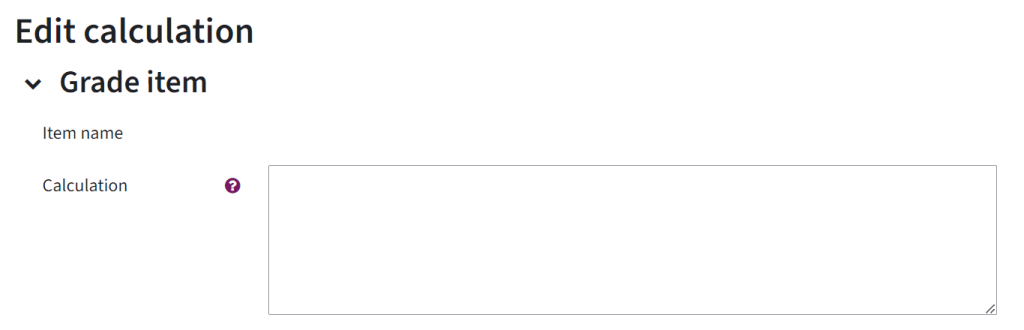
Each entry begins with an = and contains mathematical operators, e.g. max or sum. A detailed list of all operators can be found in the Moodle guide to "Grade calculations".
All activities from the course that you want to include in the calculation must be labelled with an ID in the list below the calculation field. In the equation, you use the ID by surrounding it with two square brackets.
Example 1: calculating a simple sum
- Assign IDs for the corresponding activities used in the formula, e.g. item1, item2 and click on Add ID numbers.
- Enter =sum([[item1]], [[item2]]) in the Calculation field.
![Here you can see the category Edit calculation. Under the headline Edit calculation, there is grade item, then in the next line Item name and then in the last line Caculation. Next to Calculation, there is a insert field. In the insert field, there is a formula displayed: =sum([[item1]], [[item2]])](https://telucation.tugraz.at/wp-content/uploads/2024/04/guide16_grading_calculation_example-1-e1713958574416-1024x402.png)
Example 2: Students must achieve a certain number of points in an exam, otherwise they will receive 0 points.
Students need at least 5 points in the midterm exam. Only then, their points from the midterm exam and the lab will count. If they do not pass the midterm exam, they will receive 0 points overall.
=if([[midtermexam]]>=5, [[midtermexam]]+[[lab]], 0)
Note: If you use the TeachCenter in German, you have to use semicolons to separate the parts of the calculation.
If students have not (yet) submitted anything for an assignment or have not received a grade, their grade is empty.
By default, empty grades are excluded from the grade calculation in the TeachCenter, i.e. they are ignored. During the semester, this calculation is sensible, as otherwise the overall result for students would appear distorted.
Example: The course consists of a quiz (10 points) and a homework assignment (20 points). A student has passed the quiz with 10 points, but has not yet submitted the homework assignment. The empty grades are excluded, i.e. ignored, and the student sees in the overview that they currently have 10/10 possible points and a grade of 1.
At the end of the semester, however, excluding empty grades can lead to distortion and may need to be deactivated again.
Example: The student never submitted the homework assignment. The overview still shows that they have 10/10 points and a grade of 1. However, they should only have 10/30 points and a grade of 5.
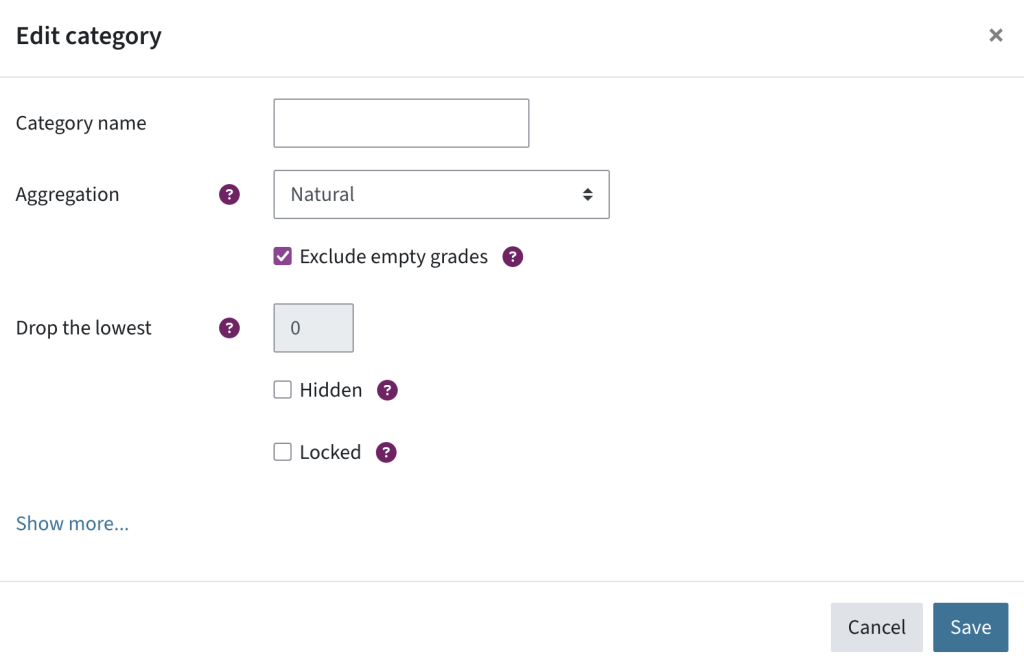
To avoid ignoring empty grades and instead awarding 0 points, click on the three dots next to the category with the course name in the Grader report > Edit category. Remove the checkmark next to Exclude empty grades.
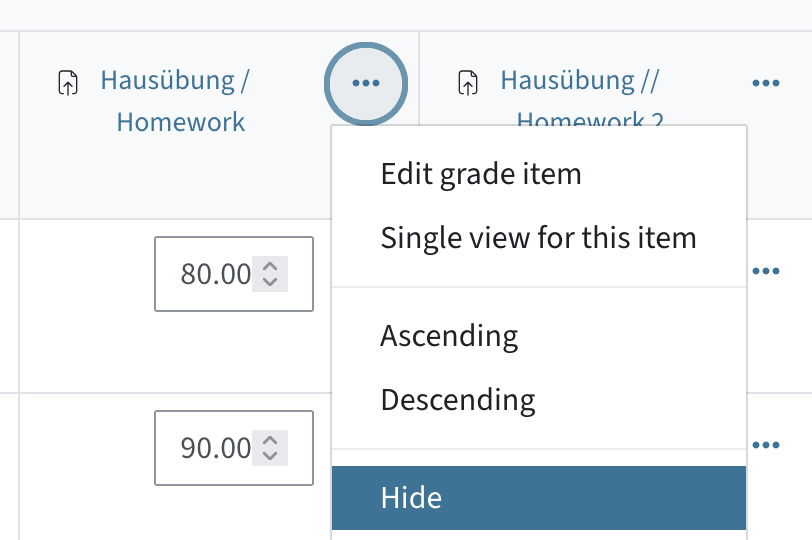
If you want to make all grades for a quiz or assignment visible to students at the same time, you can hide them in the Grader report until all grades are ready.
To hide grades manually, click on the three dots in the column of the activity and choose Hide. Use the same process to show the grades again.
Another option is to automatically hide grades until a certain date. To activate this feature, activate the editing mode and choose Edit grade item from the three-dots menu. In the following window, click Show more. Then tick the checkbox Hidden until... and enter the date when the grades should be visible.

Note: If you see the message "The visibility settings are set in the activity settings", you must first make the activity in general visible and allow students to see their points after the attempt (in a quiz, to be activated in the review options).
Grading an assignment
You can find out how to use and grade an assignment as an exam or homework in the TeachCenter (Exam) under "File upload (exam or homework) in the TU Graz TeachCenter (Exam)".
Points are given directly in the assignment.
Grading a quiz
Information on how to create a quiz activity and how to grade it can be found in the guide to "The quiz activity in TU Graz TeachCenter (Exam)".
Points are given directly in the quiz.
Downloading results
Grades can be exported from the TeachCenter or TeachCenter Exam to TUGRAZonline.
In order to be able to use this import feature, the following things must apply:
- The corresponding exam date must have been added to TUGRAZonline.
The list of exams is synchronised approx. every hour. If you have just created the exam date, wait until the exam is synchronised in the TeachCenter. - The exam date must contain students.
- You must be registered as an examiner for the exam in TUGRAZonline, or you must have the role PV administration (a special role that can only export grades – if you need this role e.g. for secretaries, contact support)
- The grading scale of your TeachCenter or TeachCenter Exam course must match the grading scale in TUGRAZonline (1-5, E/O).
Export from TeachCenter (Exam) to TUGRAZonline
To transfer grades, open the corresponding course in the TeachCenter (Exam) and go to Grades in the main menu. Click on the heading Grader report to open the drop-down, then Export.
Now you will see several sections:
- Grades to be included: "Course total" is selected by default.
- Export options: Here you can select whether the feedback on the final course grade should be exported or not. If these settings change, a new publish link must be created.
- Quick guide and publishing link: In this section, you will find an explanation on how to export the results. At the bottom of the section, there is a table with the corresponding exams.
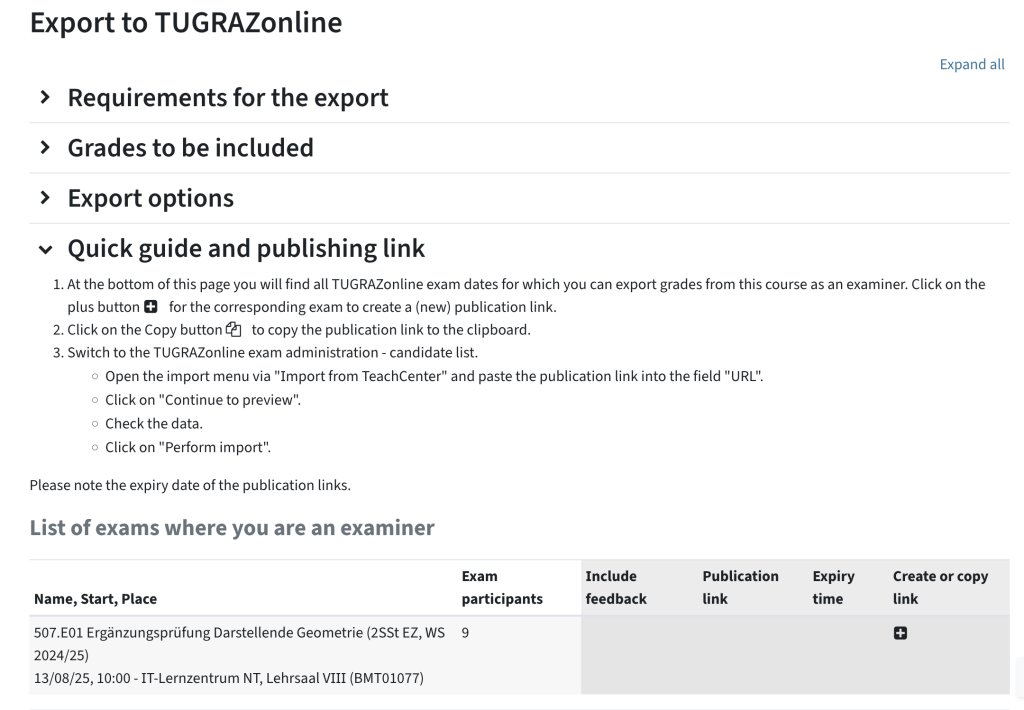
- Click the "plus icon" in last column to create or recreate a publish link.
- Click the "copy icon" to copy the created publish link to the clipboard.
- Switch to the TUGRAZonline exam management, candidate list. Select the corresponding course.
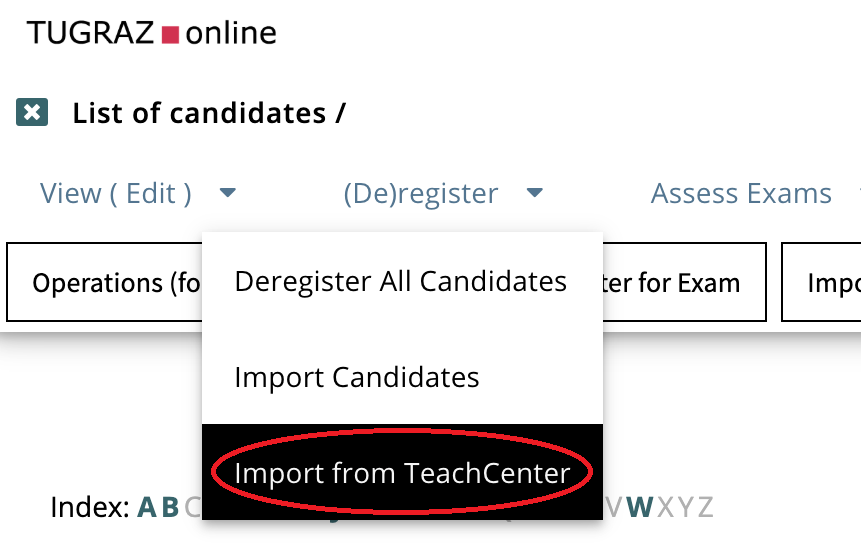
Klick (De)register to get to Import from TeachCenter
-
- Open the import mask via the menu item Import from TeachCenter and paste the publish link in the field "URL".
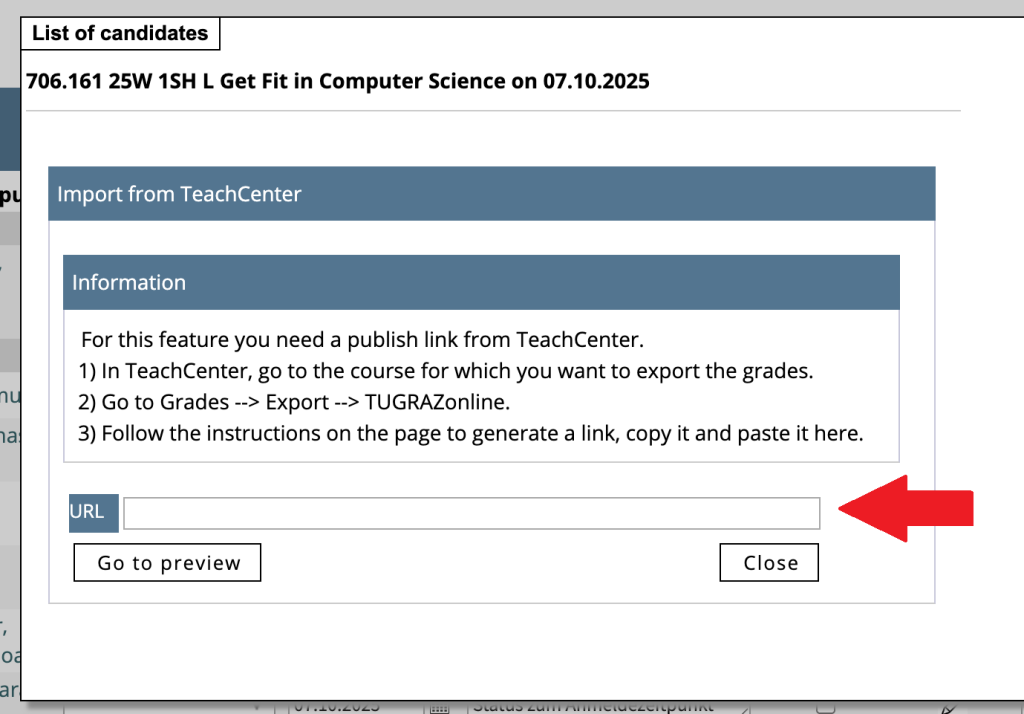
Where to add the link from the TeachCenter - Click Go to preview.
- Check the data. People without a grade in the TC will not be graded.
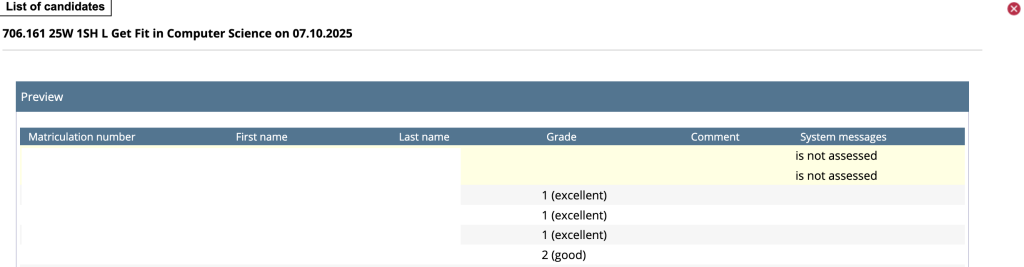
List of candidates: two students did not take the exam - Scroll all the way down and click Perform import at the end of the list.
- Open the import mask via the menu item Import from TeachCenter and paste the publish link in the field "URL".
Please note that publishing links expire after some time.
You can export the grader report as a table as Excel file, XML or text. Only the table is exported, no exam questions or answers!
In the main menu at the top, select Grades. In the drop-down menu, select Export, then the desired file format.

Note: This export is suitable for saving answers, feedback and points for archiving, e.g. at the end of the semester or after the exam.
You will receive a separate folder per person or activity, depending on the settings. The quiz is exported as a PDF so that it is easier to read. However, you will not get an overview spreadsheet like the grader report.
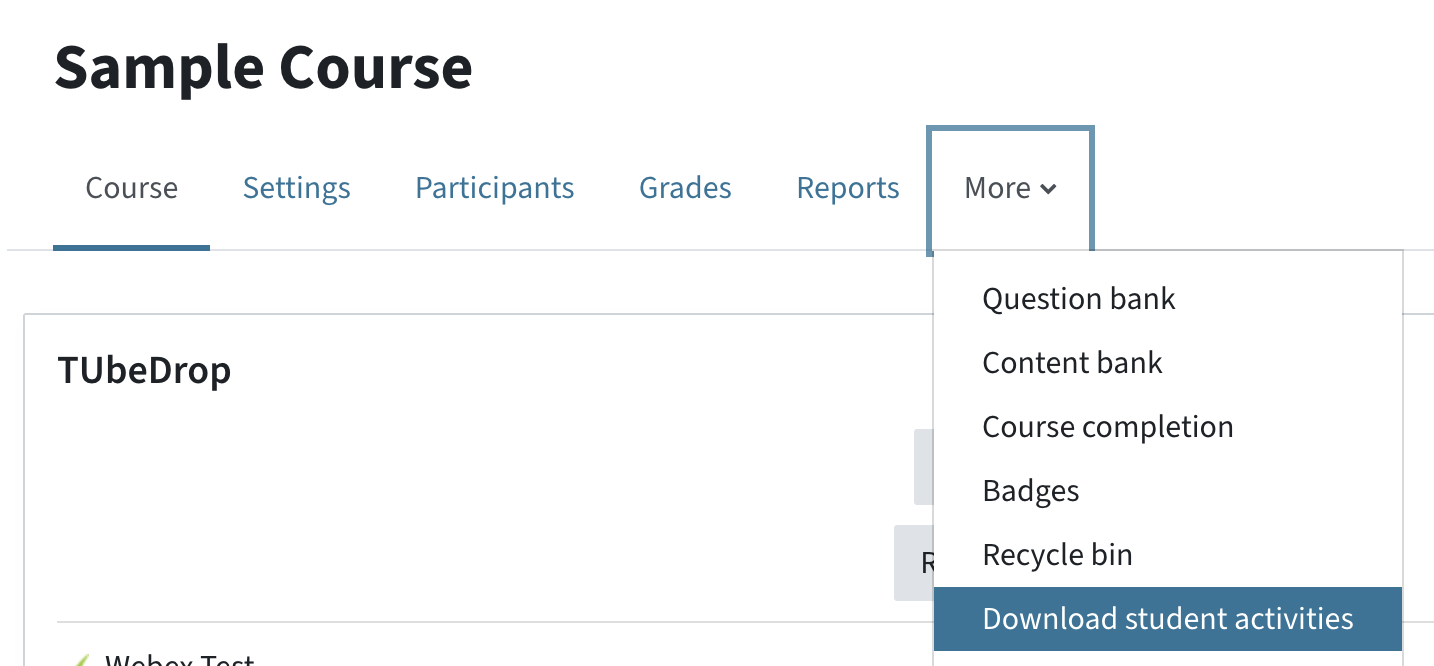
Download student activities (quizzes and assignments) as a ZIP folder via the Main menu > More > Download student activities. This menu allows you to download the answers and results of several quizzes or submissions at once.
Select whether the folder structure should be sorted by student or by activity. Select which activities you want to export. Then confirm again by clicking Create Download.
Please note: The download is generated overnight and is available the next day for 2 days (TC Exam) or 7 days (TC). You will receive an e-mail notification.
Help & Contact
For questions on TeachCenter / TeachCenter Exam: tc@tugraz.at
For more information on grading and advanced options such as weighted grades, see the official Moodle documentation in the Grade category, the Grade FAQ, and the quick guide for grading.
Licensed under a Creative Commons Attribution CC BY 4.0 International
 TU Graz Educational Technology